

The Sylvan jacket has a relaxed and accommodating match that proves versatile for all kinds of our bodies. The waist is marked on the sample to assist your match changes if wanted, and non-compulsory button tabs on the wrists and waist enable for a customizable match.
After all, a sequence of sizes is a place to begin and also you may must make some match changes to customise your Sylvan jacket to suit your distinctive form, and that’s okay! As a result of it’s a extra relaxed match, the adjustments that I’ll stroll by means of on this submit aren’t as intensive as they could possibly be in a extra fitted garment, so that may take the sting off in case you’re feeling nervous about private match changes.
And earlier than we get began, I believe you recognize what I’m going to say… it’s a good suggestion to make a muslin to verify your match and observe the stitching steps earlier than you chop into your treasured last material! You don’t need to do the sting finishes or make the whole lot excellent, however it could actually save many tears if you recognize upfront that your jacket will match.
FBA: Full Bust Adjustment
Our testers discovered that the light match by means of the shoulders was fairly accommodating of a wide range of bust dimensions and shapes, so in case you sometimes do a smaller FBA, you may not must on this fashion. Some indicators of the necessity for an FBA are inadequate circumference across the full bust when the remainder of the dimensions matches nicely, gaping on the entrance neckline mixed with pulling within the entrance armscye, and aspect seams tipping in direction of the entrance on the waist and hip.
(One tester really discovered {that a} swayback alteration was a superb different to an FBA and offered a dartless answer to wanting an extended font and shorter again. It restored the aspect seams to a vertical place, since that was her most vital match challenge. Value contemplating earlier than you begin making large adjustments!)
To do an FBA on this jacket, you’ll must mark your bust apex on the sample piece first. You should use the measurement methodology, measuring down from the excessive level of the shoulder seam and out from the middle entrance, or you possibly can merely maintain the sample piece as much as your physique, and mark the apex immediately. (The FBA is roofed in nice element on the Hinterland Bodice in our Becoming Information, so if the next steps depart you with questions, otherwise you catch the becoming bug and wish mooooorrrrre, go right here to get the Becoming Information.)
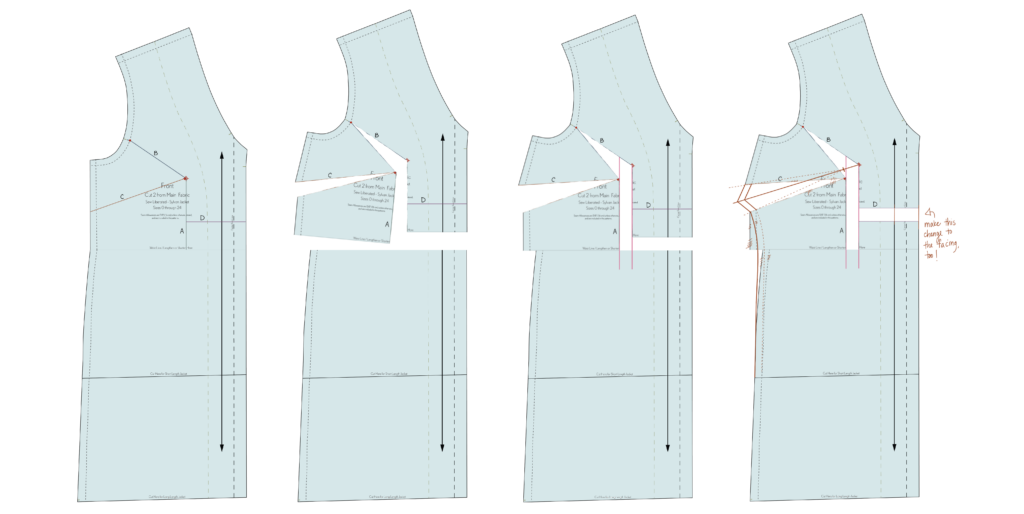
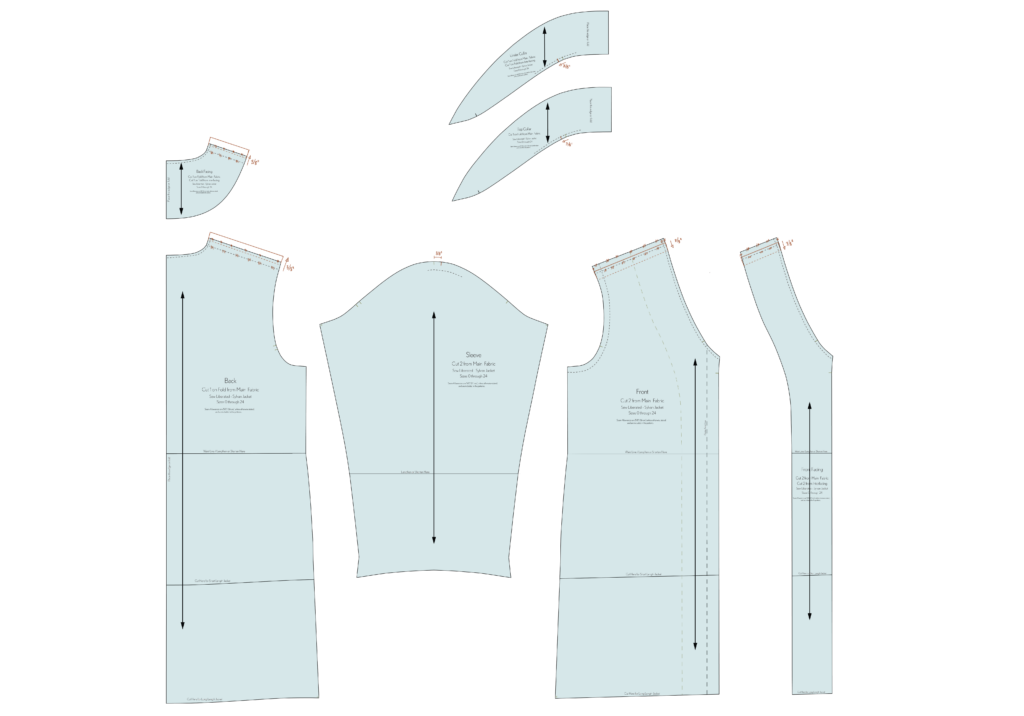
First, mark line A from apex to waist, parallel to the grainline. Mark line B from apex to the only notch within the armscye, and make a dot on the seam line (⅝” (1.6 cm) in from the lower edge for the hinge level). Mark line C from apex to the aspect seam at a barely downwards angle (this will likely be your dart opening, and it seems nicer if it angles down a little bit). Mark line D from line A to the CF, beneath the apex stage.
Reduce alongside your traces, leaving hinge factors of paper on the apex and the armscye seam allowance as proven with purple dot within the diagram. Reduce all the way in which throughout on the waist.
Mark two parallel traces in your added paper, set aside the gap of your adjustment. Tape the sample piece down on the neck space, lining up the piece with the best line in your added paper. Align the bust apex with the left line, and pivot the decrease aspect entrance to align along with your line all the way in which down. As you align this piece, line C will open up into your new dart form. Tape the items in place. Line up the decrease center entrance with the waist of the decrease aspect entrance, permitting line D to open up in a fair horizontal line. Tape in place.
To attract within the new dart, draw the middle line of your new dart. Measure down the middle line from the apex 1 to 2”, or 2.5 to five cm and mark the dart tip. Join the dart tip to the perimeters of line C on the seam line, the place it opened into the dart consumption, and draw within the dart legs. Fold the paper as if the dart had been sewn, and whereas it’s folded, lower alongside the aspect seam to create the dart consumption shaping.
You’ll have a little bit (or much less little) jog on the aspect seam the place you rejoined the bodice on the waist. Mix that jog on the aspect seam between the decrease leg of the dart and the hip. I wouldn’t advocate scooping the aspect seam shaping an excessive amount of to keep away from pulling and drag traces, and the fashion actually does enable for the waist to be undefined so avoiding overfitting is okay!
Slender Shoulder
Whereas the shoulder of the Sylvan Jacket is dropped and is meant to take a seat round ¾” to 1 ¼” out of your precise shoulder, you might must slender the shoulders a little bit to fit your personal proportions. Don’t over-fit this space in case you don’t need to!
Right here’s the right way to slender the shoulder:
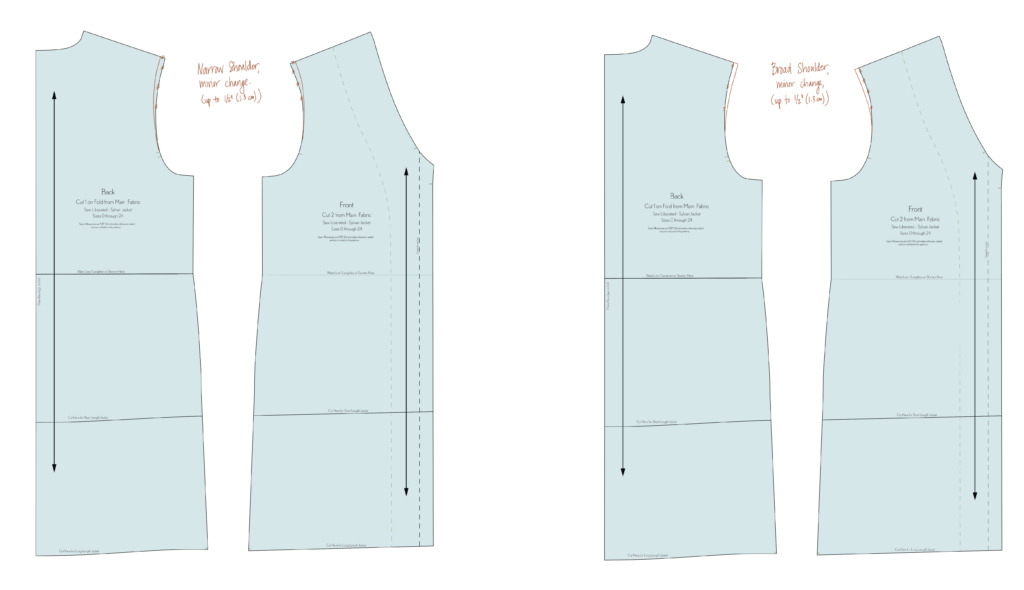
For a minor adjustment (of as much as 1/2” (1.3 cm)), measure in from the tip of the shoulder seam. Mix the shortened shoulder seam into the unique seam line and slicing line utilizing a mild curve, not making any change to the armscye beneath the notches. You need to be altering the back and front items by the identical quantity, and the armscye seam size shouldn’t change.
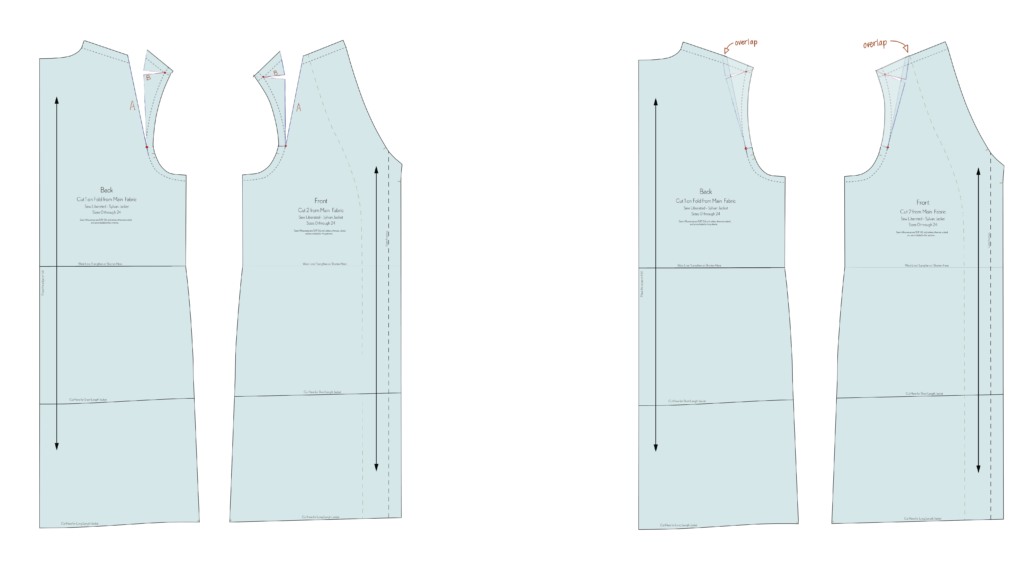
For an adjustment of larger than 1/2” (1.3 cm), you’ll method the adjustment a little bit otherwise to keep up the stability of the garment and the armscye’s size (since you don’t wish to change that seam size after which have a sleeve that doesn’t match!). First draw within the seam traces by means of the armscye. It’s vital that you just make adjustments on the stitching line, not the slicing line! Draw Line A from a few third of the way in which up the shoulder seam to the notch within the armscye. Draw Line B squared off from Line A to the low level of the shoulder seam. Reduce alongside Traces A and B, leaving hinges within the paper on the low level of the shoulder seam and the armscye, as proven with purple dots within the diagram.
Sustaining the shoulder slope, overlap alongside the seam the required quantity. The utmost quantity for this alteration is 1 1/2” (3.8 cm). Add paper the place wanted and tape the items in place.
Broad Shoulder
In the identical vein because the slender shoulder, there’s a bit extra leeway within the shoulder seam place in case your shoulders are broader. However if you wish to make adjustments, right here’s the right way to broaden the shoulder:
For a minor adjustment (of as much as 1/2” (1.3 cm)), measure out from the tip of the shoulder seam. Mix the lengthened shoulder seam into the unique seam line and slicing line utilizing a mild curve, not making any change to the armscye beneath the notches. You need to be altering the back and front items by the identical quantity, and the armscye seam size shouldn’t change.
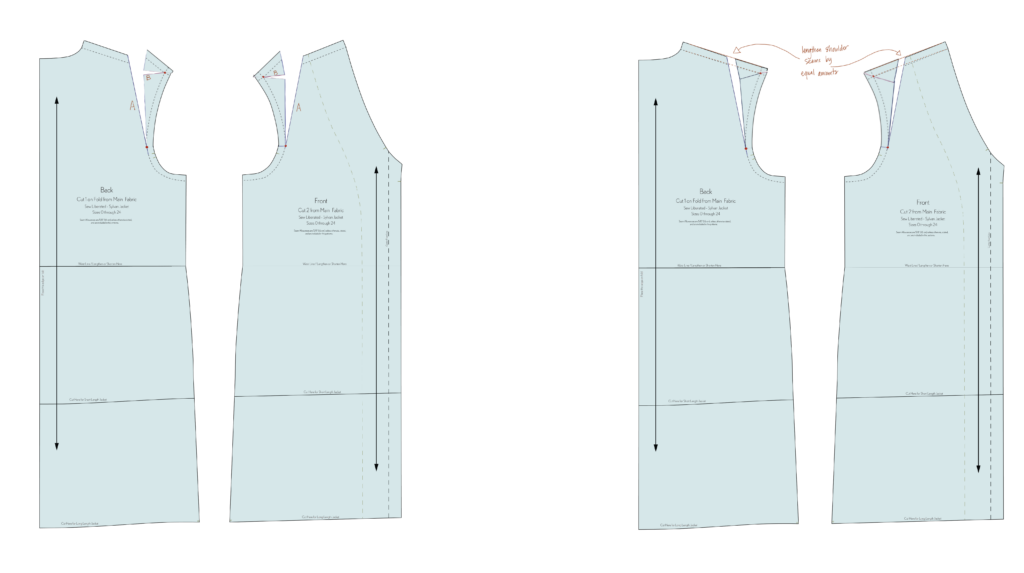
For an adjustment of larger than 1/2” (1.3 cm), first draw within the seam traces by means of the armscye. It’s vital that you just make adjustments on the stitching line, not the slicing line! Draw Line A from a few third of the way in which up the shoulder seam to the notch within the armscye. Draw Line B squared off from Line A to the low level of the shoulder seam. Reduce alongside Traces A and B, leaving hinges within the paper on the low level of the shoulder seam and the armscye, as proven with purple dots within the diagram.
Slide the outer shoulder outwards, away from the neckline, permitting the sample items to open alongside the primary lower line, and overlap alongside the second. Sustaining the shoulder slope, open alongside the shoulder seam the required quantity. The utmost quantity for this alteration is 1 1/2” (3.8 cm). Add paper the place wanted and tape the items in place.
Ahead Shoulder
A ahead shoulder adjustment is fairly easy (ha!), and you’ll examine it intimately on pages 38-40 of the Becoming Information. The one further element within the Sylvan Jacket that you just’ll want to concentrate to is the sample items for the facings and collar. As you possibly can see within the diagram, the shoulder seam notch on the collar and undercollar is moved ahead the identical quantity because the change on the excessive level shoulder, and the shoulder seams on the facings match the adjustments made to the bodice. The diagram exhibits a fair ⅜” (1 cm) shift forwards.
Mixing Sizes
When selecting a dimension, take your measurements first. Even whenever you assume you recognize your dimension, take them originally of each mission, and work from the charts. In case your measurements are becoming into a couple of dimension on the chart, check out how the sizes relate to one another. It’s simpler to regulate the waist and hip than the bust and shoulders, so select the dimensions that works finest to your higher physique, and mix sizes within the waist and/or hip if wanted. Use the Completed Measurements charts that will help you resolve by how a lot you wish to mix your sizes. For an outer layer (because you most likely need to have the ability to put on your jacket over a sweater), you’ll need about 6 -10” (15.5 cm – 25 cm) ease within the waist and hip. If, whenever you verify the charts, you see that it’s worthwhile to mix in or out within the waist or hip, use an extended, gently curving line. In the event you mix out for the waist, use that dimension for the hip as nicely.
Including or Eradicating Physique Size or Sleeve Size
The completed sleeve size is on the charts, however earlier than making large adjustments, double-check your most popular size, and do not forget that the cap is barely dropped, and also you doubtless need sufficient size to cowl your wrist along with your arms prolonged. In the event you’re including underlining, ensuring the sleeve is lengthy sufficient to show again the cuff to indicate off your cute lining can be a enjoyable possibility.
The jacket physique is available in two lengths. The waist stage is marked on the sample items, and the Common size is roughly hip stage, so you possibly can add or take away size precisely the place it’s worthwhile to refine it. The Lengthy size lands roughly mid-thigh. In the event you’re envisioning a for much longer jacket than that, watch out whenever you’re including size to consider strolling ease. Longer jackets want a strolling vent, extra circumference across the knee, or one other means for you to have the ability to take an extended step.