Mushrooms: they’re versatile, they’re scrumptious, and so they’re very simple to develop in your yard or backyard.
We have now a mushroom rising technique that’s so easy, you don’t have any excuse to not strive it out. All you want is a log or tree stump, some mushroom starter, and a few primary instruments. And you may be in your technique to producing mushrooms for years to come back!
The next excerpt is from Natural Mushroom Farming and Mycoremediation by Tradd Cotter. It has been tailored for the online.
Log & Stump Mushroom Cultivation
If you’re utilizing plug spawn, match the depth and diameter of your holes to your plugs. If you’re utilizing sawdust spawn, you might want a barely bigger diameter relying on the software you employ to insert the sawdust.
Folks have been rising mushrooms on logs and stumps for lots of, presumably hundreds, of years. It is among the easiest methods to domesticate edible and medicinal forest mushrooms equivalent to shiitakes, maitakes, and oysters. In actual fact some mushrooms, equivalent to maitakes, are simpler to develop outdoor underneath pure circumstances than indoors.
Out of doors log and stump cultivation is usually low-tech, however when practiced on a big scale it requires loads of preliminary labor in getting the logs or stumps arrange. For that reason the log-grown mushroom trade has developed extra rapidly in international locations the place labor is plentiful and cheap and the applied sciences required for indoor cultivation are restricted.
General, I don’t advocate out of doors log and stump cultivation for business enterprises. It’s higher suited to home-scale and pastime rising, or as supplemental earnings for a small business enterprise.
Stumps vs. Logs: The place to Begin
Cultivating mushrooms on stumps is much like cultivating them on logs, though if you’re a newbie, I like to recommend beginning with logs, since stumps can take a few years to fruit. (As soon as they begin, they will fruit for a decade or extra.) You employ the identical inoculation methods, equivalent to drilling and plugging with dowels or sawdust spawn.
The primary distinction is that you simply plug as a lot of the seen barked wooden that is still aboveground as attainable and also you additionally spawn the outer ring of the highest, reduce face of the stump. Many mushrooms, equivalent to maitakes, hen of the woods, reishis, enoki, oysters, and beefsteaks, profit from stump moderately than log cultivation.
Rising Mushrooms Open air: A Step-By-Step Course of
Step 1. Minimize your logs into lengths which are straightforward to deal with and carry. The commonest lengths are between 2 and 4 toes, relying on how a lot weight you, or the people who find themselves serving to you, can carry. And intention for a diameter for six to 10 inches. Since you might be selecting these logs up typically, select a dimension that most closely fits your power and skills.
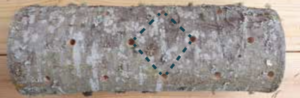
Use a diamond drilling sample all the best way across the barked floor of the log. Nearer spacing will pace up colonization, however I recommend spacing the holes 4 to six inches aside.
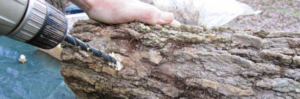
Step 2. Subsequent you have to to drill holes into the log at common intervals at a depth of about 1 to 11/2 inches. Most plug spawn in the marketplace name for a 5/16-inch drill bit, though this may range; simply match the drill bit to the plugs you’re utilizing. When you’re utilizing sawdust spawn, match the bit to the dimensions of the packing software you’re utilizing.
A high-speed drill bit hooked up to an angle grinder with an adapter will be effectively definitely worth the funding if you’re inoculating a lot of logs. The upper rpm and pace makes drilling logs easy in comparison with an everyday electrical energy drill.
Drill your holes in a diamond sample, all the best way across the bark-covered floor of the wooden, spacing the holes about 4 to six inches aside. Drilling and spawning extra holes won’t produce extra mush- rooms, however it can pace up the colonization course of for earlier fruiting. I might not advise spacing your holes farther than 6 inches aside otherwise you enhance the danger of attracting spores from competing fungi. This doesn’t “damage” the mycelium you spawned, however it can scale back your yield by taking worthwhile actual property away out of your tradition.
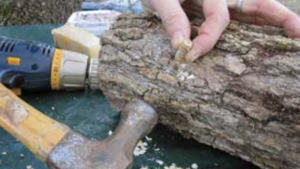
Faucet the plug spawn in gently. Watch these fingers!
Step 3. Insert spawn into every gap, tapping with a hammer if you’re utilizing plugs or tamping with a dowel if you’re utilizing sawdust. Fill the opening till the spawn is flush with the bark. Brush a small quantity of melted wax over the spawned gap to seal within the spawn. Wax helps preserve moisture within the gap, supporting the mycelium because it drills its manner outward from the sawdust or plug into the partitions of the freshly drilled holes.
Some growers additionally wax the ends of their logs to lock in moisture, however that may additionally lock it out. An alternative choice is to wax one finish and never the opposite, permitting moisture to wick within the unwaxed aspect throughout rainfall, throughout an in a single day soak, or when it comes into contact with the moist floor.
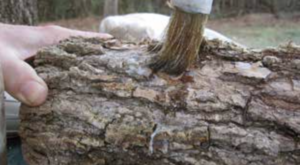
Cowl the plug with wax to protect the moisture and hold contamina- tion and bugs out. This offers the mycelium sufficient time to drill its manner into the cavity and start colonization.
Step 4. Situate the logs in a shady space with dappled forest mild, or on the shady aspect of a constructing in case you’re in an city atmosphere. Find them close to a water supply for simple watering and soaking when mandatory.
The colonization section can take six to 10 months, relying on the kind of wooden, temperatures, and spawn spacing. Go to the logs periodically—no less than as soon as a month throughout the first six months. The wax you utilized could disappear or crack and fall off, which is okay because the mycelium actually solely wants only a few weeks of safety after spawning.
Dry circumstances can gradual colonization, so calmly water the stack as soon as every week or so to take care of moisture if it has not rained. Choose up just a few of the logs to really feel the burden; if they’re extraordinarily dry and appear a lot lighter than they had been at spawning, you might need to soak them in a single day with water—however for not than twenty-four hours, or the mushroom mycelium can drown.
Submerge the logs in water in a trash can, massive plastic tote, or low cost child pool. Use different logs or bricks to overwhelm the logs, protecting them fully submerged.
One other various is to mist them gently over a interval of every week or extra, to step by step enable the logs to wick in moisture. This feature can waste water, nevertheless.
Step 5. About six months after inoculation, begin inspecting the log ends as soon as every week for indicators of mycelium, equivalent to white streaks on the open reduce face, which indicators that the mycelium is approaching full colonization and can quickly be able to fruiting. Optimum moisture is now extra essential than ever to make sure that the mycelium will be capable to provide the rising mushrooms all through the pinning and fruiting levels.
At this level, because the mycelia within the logs method full colonization, the stacked logs could start to fuse collectively.
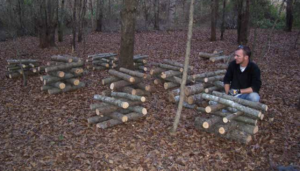
Stack your logs in a shady spot for colonization. I hold them stacked tightly collectively to protect moisture whereas they’re colonizing after which restack them on this open-air log cabin fashion as soon as they present indicators of fruiting.
Soak them in a single day in water after which unfold them out in a “log cabin” formation, or lean them towards the trunks of residing timber in a round formation, with one finish on the bottom and the opposite resting towards the tree.
Step 6. In the end, your mushrooms will start fruiting. Logs will fruit two or thrice a yr, sometimes for as a few years as they’re inches in diameter, resting just a few weeks in between every flush.
Mushrooms could fruit close to the spots the place you set the spawn on the primary flush, as a result of it’s a straightforward escape, however they will additionally fruit from nearly anyplace across the complete bark floor.
When you discover child shiitake mushrooms, which is able to cut up the bark and seem as darkish brown to black buttons, mist them as a lot as you’ll be able to; a number of occasions a day is good.
A misting system is most well-liked for business log manufacturing, or just find your logs close to your property to mist them within the morning and night as you go them by.
In case your logs have floor contact, test that space typically, since they may direct their fruiting downward within the seek for water. When the mushrooms have matured, it’s time to reap!
Hold data of the flushing patterns and set up a schedule for watering that coincides with these patterns; this won’t solely enhance yields however enhance your understanding of the mushrooms you might be cultivating. As soon as mushrooms are colonized and able to fruit, they are going to be ready for satisfactory water to help fruiting. Time the wa- tering for when the mushrooms have had sufficient relaxation and are absolutely charged to make the most of the watering; this offers you the optimum fruiting with every flush.